Introduction to Fabric.js. Part 4.
We've covered so many topics in the previous series; from basic object manipulations to animations, events, filters, groups, and subclasses. But there's still couple of very interesting and useful things to discuss!
Free drawing
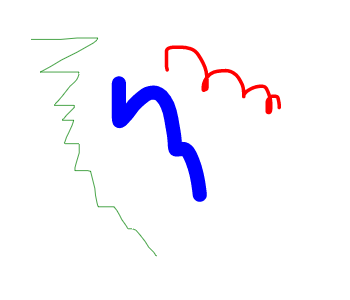
If there's anything <canvas> really shines at, it's that it has an excellent support for free drawing! Since canvas is simply a 2D bitmap — a paper to paint on — performing free drawing is very natural. And of course Fabric takes care of this for us.
A free drawing mode is enabled simply by setting isDrawingMode property of Fabric canvas to true. This immediately makes any further clicks and movements on canvas get interpreted as a pencil/brush.
You can paint as many times on canvas as you wish, while isDrawingMode is true. But as soon as you perform any movement, followed by a "mouseup" event, Fabric fires "path:created" event and actually transforms just-drawn shape into a real fabric.Path instance!
If, at any moment, you set isDrawingMode back to false, you'll end up with all of the created path objects still present on canvas. And since they're good old fabric.Path objects, you can modify them any way you want — move, rotate, scale, etc.
There are also 2 properties available to customize free drawing — freeDrawingBrush.color and freeDrawingBrush.width. Both are available on Fabric canvas instances through freeDrawingBrush instance. freeDrawingBrush.color can be any regular color value and represents the color of a brush. freeDrawingBrush.width is a number in pixels, and represents brush thickness.
In the near future, we are planning to add more options for free drawing — various versions of a brush (e.g. spray-like or chalk-like). Also custom brush patterns, and an option to extend with your own, similar to Fabric image filters.
Erasing is another cool available feature that plays nicely with free drawing.
Customization
One of the amazing things about Fabric is how customizable it is. You can tweak dozens of various parameters on canvas or canvas objects, in order to make things behave exactly the way you want. Let's take a look at some of them.
Locking objects
Every object on canvas can be locked in few ways. "lockMovementX", "lockMovementY", "lockRotation", "lockScalingX", "lockScalingY" are properties that lock corresponding object actions. So setting object.lockMovementX to true prevents object from being moved horizontally. You can still move it in vertical plane though. Simiarly, lockRotation prevents rotation and lockScalingX/lockScalingY — scaling. All of these are cumulative. You can combine them together in any way.
Changing borders, corners
You can control objects' borders and corners visibility via "hasControls" and "hasBorders" properties. Just set them to false and objects instantly render "naked".
object.hasBorders = false;
object.hasControls = false;
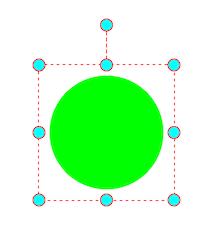
You can also change their appearance by tweaking some of the customization properties "cornerDashArray", "borderDashArray", "borderColor", "transparentCorners" "cornerColor", "cornerStrokeColor", "cornerStyle", "selectionBackgroundColor", "padding" and "cornerSize" properties.
object.set({
  borderColor: 'red',
  cornerColor: 'green',
  cornerSize: 6
});
  object.set({
    transparentCorners: false,
    cornerColor: 'blue',
    cornerStrokeColor: 'red',
    borderColor: 'red',
    cornerSize: 12,
    padding: 10,
    cornerStyle: 'circle',
    borderDashArray: [3, 3]
  });
Disabling selection
You can disable selection of objects on canvas by setting "selection" property of canvas to false. This prevents selection on absolutely everything displayed on canvas. If you only need to make certain objects unselectable, you can change "selectable" property of objects. Just set it to false and an object loses its interactivity.
Customizing selection
Now, what if you don't want to disable selection, but instead want to change its appearance? No problem.
There are 4 properties on canvas that control its presentation — "selectionColor", "selectionBorderColor", "selectionLineWidth", and "selectionDashArray". These should be pretty self-explanatory, so let's take a look at an example:
canvas.add(new fabric.Circle({ radius: 30, fill: '#f55', top: 100, left: 100 }));

canvas.selectionColor = 'rgba(0,255,0,0.3)';
canvas.selectionBorderColor = 'red';
canvas.selectionLineWidth = 5;
The last property — "selectionDashArray" — is not as straightforward. What it allows us to do is make selection lines dashed. The way to define dash pattern is by specifying intervals via an array. So to create a pattern where there's one long dash followed by one short dash, we could use something like [10, 5] as "selectionDashArray". This will draw a line that's 10px long, then skip 5px, draw 10px line again, and so on. If we were to use [2, 4, 6] array, the pattern would be created by drawing 2px line, then skipping 4px, then drawing 6px line, then skipping 2px, then drawing 4px line, then skipping 6px, and so on. You get the point. As an example, this is how [5, 10] pattern looks:
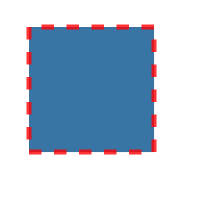
Dashed stroke
Similarly to "selectionDashArray" on canvas, all Fabric objects have "strokeDashArray" property responsible for dashed pattern of any stroke performed on an object.
var rect = new fabric.Rect({
  fill: '#06538e',
  width: 125,
  height: 125,
  stroke: 'red',
  strokeDashArray: [5, 5]
});
canvas.add(rect);
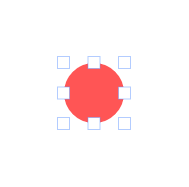
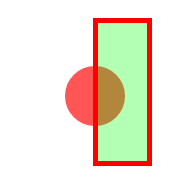
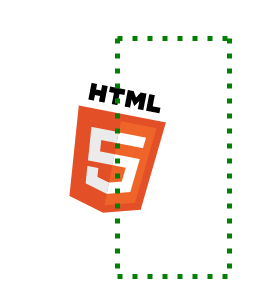
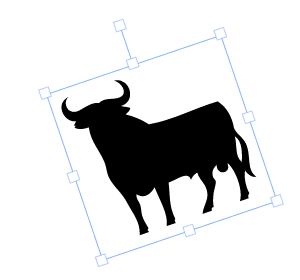
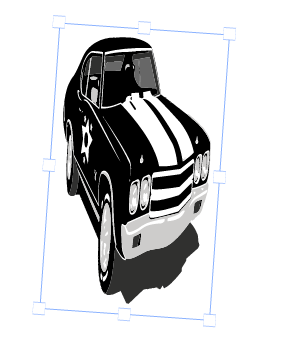
Clickable area
As you know, all Fabric objects have bounding box that's used to drag an object, or rotate and scale it, when controls/corners are present. You might have noticed that object can be dragged even when clicking on the space within object's bounding box where nothing is drawn.
Take a look at this image:

By default, all Fabric objects on canvas can be dragged by the bounding box. However, if you want different behavior — clicking/dragging objects only by its actual contents, you can use "perPixelTargetFind" property on an object. Just set it to true to get the desired behavior.
Rotating point
Since version 1.0 Fabric uses alternative UI by default — objects can no longer be scaled and rotated at the same time. Instead, there's a separate rotate control on each object. The corresponding property for that control is "hasRotatingPoint". You can customize its offset relative to the object via "rotatingPointOffset" numeric property.
Object transformation
There's a number of other transformation-related properties available in Fabric since version 1.0. One of them is "uniScaleTransform" on canvas instance. It's false by default, and can be used to enable non-uniform scaling of object; in other words, it allows to change object's proportions when dragging by the corners.
Then there are "centeredScaling" and "centeredRotation" properties (before v1.3.4 was one property - "centerTransform"). They specify if a center of an object should be used as an origin of transformation. When both of them are set totrue, it replicates pre-1.0 behavior when objects were always scaled/rotated from the center. Since 1.0 origin of transformation is dynamic, which allows for finer control when scaling objects.
The last pair of new properties is "originX" and "originY". Set accordingly to "left" and "top" by default, they allow to change object's origin of transformation programatically. When you drag object's corners, it is these properties that change dynamically under the hood.
So when would we change them manually? For example, when working with text objects. When you change text dynamically, and the text box dimensions increase, "originX" and "originY" dictate where the box grows. So if you need to center text object, you would set originX to "center". To stick it to the right, you would set originX to "right". And so on. This behavior resembles "position: absolute" in CSS.
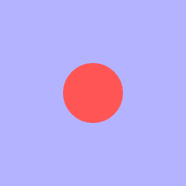
Canvas background and overlay
As you might remember from the 1st part, you can assign a color to fill entire canvas background. Just set any regular color value to "backgroundColor" property of canvas.
canvas.add(new fabric.Circle({ radius: 30, fill: '#f55', top: 100, left: 100 }));
canvas.backgroundColor = 'rgba(0,0,255,0.3)';
canvas.renderAll();
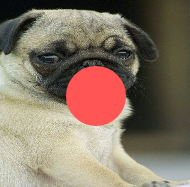
You can go even further and assign an image as a background. You'll need to use setBackgroundImage method for that, passing url and an optiona completion callback.
canvas.add(new fabric.Circle({ radius: 30, fill: '#f55', top: 100, left: 100 }));
canvas.setBackgroundImage('../assets/pug.jpg', canvas.renderAll.bind(canvas));
Is important to note that while the property is called `backgroundImage` it can host any fabric object type. You can set a `fabric.Rect` to represent an artboard, or you can set a group of objects. Same goes for the below `overlayImage` or for the `backgroundColor` that can host any filler, like gradients or patterns.
Finally, you can also set overlay image, in which case it will always appear on top of any objects rendered on canvas. Just use setOverlayImage, passing url and an optional completion callback.
canvas.add(new fabric.Circle({ radius: 30, fill: '#f55', top: 100, left: 100 }));
canvas.setOverlayImage('../assets/jail_cell_bars.png', canvas.renderAll.bind(canvas));

Fabric on Node.js
One of the unique aspects of Fabric, is that it can work not just on a client, in a browser, but also on a server! This could be useful when you want to send data from a client and create an image of that data right on a server. Or if you simply want to use Fabric API from a console — for speed, convenience, or other reasons.
Let's take a look at how to set up Node environment and start Fabric.
First, you need to install Node.js, if you haven't yet. There are few ways to install Node, depending on a platform. You can follow these instructions or these.
Once Node is installed, we need to install node-canvas library. node-canvas is a Canvas implementation for NodeJS. It relies on Cairo — 2D graphics library which can be run on Mac, Linux, or Windows. node-canvas has dedicated installation instructions depending on your platform of choice.
Since Fabric runs on top of Node, it comes as an NPM package. So the next step is to install NPM. You can find installation instructions in its github repo.
The final step is to install Fabric package, using NPM. This is done simply by running npm install fabric (or npm install -g fabric to install package globally).
If we run node console now, we should have both node-canvas and Fabric available for use:
> node
...
> typeof require('canvas'); // "function"
> typeof require('fabric'); // "object"
Now that everything is ready, we can try a simple "hello world" test. Let's create a helloworld.js file:
var fs = require('fs'),
    fabric = require('fabric').fabric,
    out = fs.createWriteStream(__dirname + '/helloworld.png');

var canvas = new fabric.StaticCanvas(null, { width: 200, height: 200 });
var text = new fabric.Text('Hello world', {
  left: 100,
  top: 100,
  fill: '#f55',
  angle: 15
});
canvas.add(text);
canvas.renderAll();

var stream = canvas.createPNGStream();
stream.on('data', function(chunk) {
  out.write(chunk);
});
and then run it as node helloworld.js. Opening helloworld.png reveals this:

So what's going on here? Let's go over important parts of this code.
First, we're including Fabric itself (fabric = require('fabric').fabric). Then, we create the good old Fabric canvas.
Then there's familiar-looking object creation (new fabric.Text()) and canvas addition (canvas.add(text)).
All of this simply creates Fabric canvas and renders text object onto it. Now, how to create an image of whatever is rendered on canvas? Using createPNGStream method available right on the canvas instance. createPNGStream returns Node's stream object, and can then be output into an image file using on('data'), and writing into the stream corresponding to an image file (fs.createWriteStream()).
fabric.Canvas#createPNGStream is one of the methods specific to Node. Everything else works the same — you can still create objects as you usually would, add them on canvas, modify, render, and so on.
Node server and Fabric
As an example, let's create a simple Node server that will listen to incoming requests with Fabric data in JSON format, and output an image of that data. The entire script is only 25 lines long!
var fabric = require('fabric').fabric, // or import { fabric } from 'fabric';
    http = require('http'),
    url = require('url'),
    PORT = 8124;

var server = http.createServer(function (request, response) {
  var params = url.parse(request.url, true);
  var canvas = new fabric.StaticCanvas(null, { width: 200, height: 200 });

  response.writeHead(200, { 'Content-Type': 'image/png' });

  canvas.loadFromJSON(params.query.data, function() {
    canvas.renderAll();

    var stream = canvas.createPNGStream();
    stream.on('data', function(chunk) {
      response.write(chunk);
    });
    stream.on('end', function() {
      response.end();
    });
  });
});

server.listen(PORT);
Most of the code in this snippet should be already familiar. The gist of it is inside server response. We're creating Fabric canvas, loading JSON data onto it, rendering it, and streaming final result as server response.
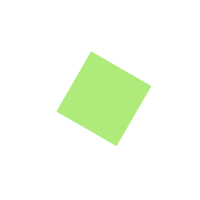
To test it out, let's take the data for a green, slightly rotated rectangle:
{"objects":[{"type":"rect","left":103.85,"top":98.85,"width":50,"height":50,"fill":"#9ae759","overlayFill":null,"stroke":null,"strokeWidth":1,"strokeDashArray":null,"scaleX":1.39,"scaleY":1.39,"angle":30,"flipX":false,"flipY":false,"opacity":0.8,"selectable":true,"hasControls":true,"hasBorders":true,"hasRotatingPoint":false,"transparentCorners":true,"perPixelTargetFind":false,"rx":0,"ry":0}],"background":"rgba(0, 0, 0, 0)"}
URI-encode it:
%7B"objects"%3A%5B%7B"type"%3A"rect"%2C"left"%3A103.85%2C"top"%3A98.85%2C"width"%3A50%2C"height"%3A50%2C"fill"%3A"%239ae759"%2C"overlayFill"%3Anull%2C"stroke"%3Anull%2C"strokeWidth"%3A1%2C"strokeDashArray"%3Anull%2C"scaleX"%3A1.39%2C"scaleY"%3A1.39%2C"angle"%3A30%2C"flipX"%3Afalse%2C"flipY"%3Afalse%2C"opacity"%3A0.8%2C"selectable"%3Atrue%2C"hasControls"%3Atrue%2C"hasBorders"%3Atrue%2C"hasRotatingPoint"%3Afalse%2C"transparentCorners"%3Atrue%2C"perPixelTargetFind"%3Afalse%2C"rx"%3A0%2C"ry"%3A0%7D%5D%2C"background"%3A"rgba(0%2C%200%2C%200%2C%200)"%7D
And pass to a server via a "data" query param. The immediate response, coming back with "image/png" Content-type, looks like this:
As you can see, working with Fabric on a server is very easy and straightforward. Feel free to experiment with this snippet. Perhaps change canvas dimensions from within URL parameters, or modify client data before returning image as a response.
Custom fonts in Fabric on Node
Before we can use custom fonts in Fabric we need to load them first. In the browser (client-side) the most common way to load fonts is by using the CSS3 @font-face rule. In Fabric on Node (server-side) we can utilize the node-canvas Font API, which makes loading fonts a walk in the park.
The example below demonstrates how to load and use custom fonts. Save it to customfont.js and make sure the paths to the font files are correct. In this example we use Ubuntu as our custom font.
  var fs = require('fs'),
      fabric = require('fabric').fabric; // or import { fabric } from 'fabric';

  fabric.nodeCanvas.registerFont(__dirname + '/test/fixtures/Ubuntu-Regular.ttf', {
    family: 'Ubuntu', weight: 'regular', style: 'normal'
  });
  fabric.nodeCanvas.registerFont(__dirname + '/test/fixtures/Ubuntu-Bold.ttf', {
    family: 'Ubuntu', weight: 'bold', style: 'normal'
  });
  fabric.nodeCanvas.registerFont(__dirname + '/test/fixtures/Ubuntu-Italic.ttf', {
    family: 'Ubuntu', weight: 'regular', style: 'italic'
  });
  fabric.nodeCanvas.registerFont(__dirname + '/test/fixtures/Ubuntu-BoldItalic.ttf', {
    family: 'Ubuntu', weight: 'bold', style: 'italic'
  });

  var canvas = new fabric.StaticCanvas(null, { width: 300, height: 250 });

  var text = new fabric.Text('regular', {
      left: 0,
      top: 50,
      fontFamily: 'Ubuntu'
  });
  canvas.add(text);

  text = new fabric.Text('bold', {
      left: 0,
      top: 100,
      fontFamily: 'Ubuntu',
      fontWeight: 'bold'
  });
  canvas.add(text);

  text = new fabric.Text('italic', {
      left: 0,
      top: 150,
      fontFamily: 'Ubuntu',
      fontStyle: 'italic'
  });
  canvas.add(text);

  text = new fabric.Text('bold italic', {
      left: 0,
      top: 200,
      fontFamily: 'Ubuntu',
      fontWeight: 'bold',
      fontStyle: 'italic'
  });
  canvas.add(text);
  canvas.renderAll();
  var out = fs.createWriteStream(__dirname + '/customfont.png');
  var stream = canvas.createPNGStream();
  stream.on('data', function(chunk) {
      out.write(chunk);
  });
Running the example with node customfont.js creates an image (customfont.png) that looks like this:

Lets have a closer look at what's happening.
On fabric.nodeCanvas is exposed the node-canvas library required from JSDOM to interface the node-canvas with the HTMLCanvas Api.
For each font file we want to use we need to register the file with fabric.nodeCanvas.registerFont() by passing the font file path and an object that specifies the font properties.
Remember that this has to happen before creating the Canvas itself.
Now we can use our font by setting the fontFamily property of fabric.Text objects to the font name.
In combination with the fontWeight and fontStyle properties we are able to apply the font faces we've added.
See Part 2 (Text) for more info on these properties.
Note that the example shows how to use custom fonts when creating new text objects, but this also applies to text objects loaded via JSON.
And so this brings us to the end of the 4-part series on Fabric. I hope you're now equiped with enough knowledge to create something interesting, cool, useful, funny, challenging, exciting!